How to Easily Find the Ideal Reverb Time and Settings for Your Song
A practical mixing guide for creators who struggle with inconsistent reverb settings. Learn how to count reverberation beats after stopping playback to craft cohesive, transparent spaces without muddying your mix.
💡 Quick Summary (TL;DR)
Stop guessing reverb decay in milliseconds! Instead of relying on complex mathematical formulas:
- Play your track and count beats (“1, 2, 3, 4”) along with your tempo.
- Hit STOP and keep counting beats in your head.
- Audible for 2+ beats after stop? → Long, atmospheric depth.
Fades out within 1–2 beats? → Tight, natural rhythm that keeps the mix clean.
This real-time counting routine works across any DAW and any reverb plugin.
When composing, arranging, and mixing, almost everyone uses reverb to pursue the atmosphere and cohesive glue of a song.
At that time, especially for those not yet fully accustomed to mixing, you might find yourself applying it deeply based on vague vibes, or conversely applying it too shallowly—resulting in inconsistent, haphazard settings every time.
Considering that DAW environments differ and each creator has their own favorite reverb plugins, I will intentionally avoid citing specific plugins or arbitrary millisecond values.
Instead, I’d like to share an intuitive benchmark to find the right reverb length and settings in any environment.
How to Find the Length and Settings of Reverb
In conclusion, the criterion is:
💡 The Practical Benchmark
[How many beats does the reverb tail remain audible to your ears?]
Use this as a guide to judge whether it matches your envisioned image.
While perceived decay may vary depending on the listener (or fatigue and monitoring conditions on the day), referenced against your track’s tempo (BPM), here is roughly what you can expect:
| Perceived Reverb Tail Duration | Spatial Impression & Character |
|---|---|
| Audible for 2 beats or longer | Long, deep reverb |
| Fades out within 1 or 2 beats | Short, tight reverb |
That is how it will generally sound to the ears.
Step-by-Step Routine in Your DAW
Try this right now in your DAW software: play the entire mix or solo a specific track, count “1, 2, 3, 4” along with the song, and hit the stop button!
[Playing]   ── Count the rhythm in time with the tempo: "1, 2, 3, 4"
                                ↓
[Hit Stop]  ── Press STOP abruptly!
                                ↓
[The Tail]  ── Keep counting beats mentally: "1, 2, 3, 4"
                                ↓
Listen closely: How many beats does the reverb tail linger before vanishing?
The key point here is: [keep counting beats even after stopping] and listen carefully to how many beats the reverberation remains audible.
Why Counting Beats Matters & Applying It to Your Mix
This does not mean that a specific beat count is universally “correct” or “wrong.”
Rather, it serves as your objective benchmark:
- “How much reverberation communicates the song’s strengths best to myself and listeners?”
- “Does it match the genre and speed of the track as envisioned?”
If reverb is too deep or too long, the tail spills excessively into subsequent notes, making the sound indistinct and hard to hear—so caution is needed. However, depending on the genre or arrangement, that very overflow may be exactly what is needed.
Having this benchmark allows you to deliberately reflect your own originality and identity into your mix and arrangement, which is the ideal goal.
Count the Beats to Measure Reverb Length and Settings
With this benchmark in mind, approaching parameters like reverb time, damping, Dry/Wet, and Mix balance will be a sure step toward finding the ideal atmosphere and cohesion for your track, regardless of which plugin or parameter layout you use.
Finally: When in Doubt About Reverb Selection
If you are unsure which type of reverberation to choose—Room, Hall, Chamber, or Plate—try picking a Plate Reverb if available in your plugin presets.
Speaking from personal recommendation, plate reverbs tend to be relatively easy to handle (comparatively speaking, of course) whether used long or short.
Since personal taste plays a role, having one ready as a send reverb can be very handy in many situations.
[!TIP] Key Tip for Aux Sends:
When setting it up on an auxiliary send track, I recommend setting the plugin’s Dry/Wet knob to Max (100% Wet), and balancing the level solely using the track’s Send value.
Featured Tool: Plate core 12AU7 VCA core 26x
If you are looking for a plate reverb, please give our in-house plugin Plate core 12AU7 VCA core 26x a try (a free trial demo is also available).
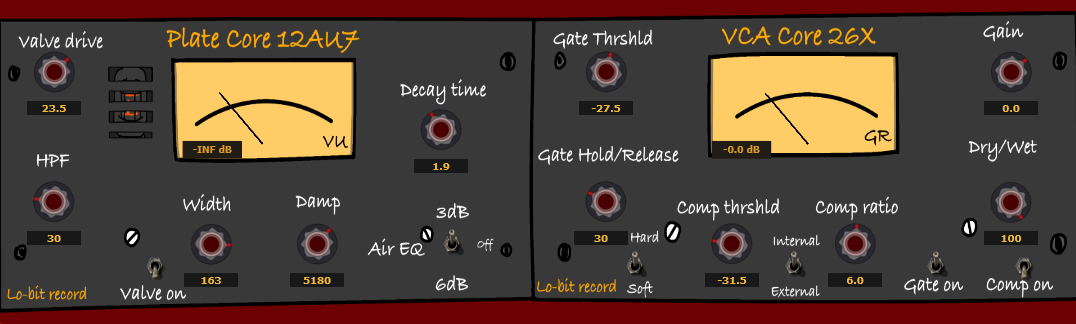
Plate core 12AU7 VCA core 26x
This VST/AU plugin combines the authentic acoustic texture of vintage EMT 140 vacuum tube plates with simulated dbx series gate/compression. In addition to standard lush plate reverb, it uniquely lets you experience classic 80s gated reverb in a single, one-of-a-kind analog modeling plugin.
I would be honored if this helps your music take a step closer to your ideal sound.
*Tracks created using the environments, gear, and techniques featured on this site are available for preview and free download in the Lo-bit LAB Free BGM Library. Continuously updated.*

Lin Wolinski / Lo-bit record
Musician, Recording & Mixing Engineer, Music Instructor (Guitar, Bass, DTM, Composition & Arrangement), and C++ Audio DSP Plugin Developer.
Active as Bassist, Synthesist, Backing Vocalist, and Composer/Arranger for the rock band "Once Grace Forever".
Following musical study in Australia, actively engaged in professional music production, bespoke mixing & mastering, boutique audio plugin development under "Lo-bit record", releasing royalty-free music assets, and authoring audio engineering resources.